
 Pin it
I've come to depend on these filling frozen breakfast sandwiches for those crazy mornings when we need something good to eat without any fuss. I came up with this trick while balancing work commutes and school drop-offs, and now I always keep some waiting in the freezer.
I first put these together during one hectic week full of early commitments, and they've stuck around as our pre-camping trip tradition. Even my sleepy teens can warm them up themselves before school while I'm still in bed.
What You'll Need
- Eggs: The large kind form a soft foundation and pack the protein you need to kick off your morning
- Milk: Brings moisture and creaminess to your eggs so they turn out nice and soft
- Sour cream: My hidden helper that turns ordinary eggs into something incredibly smooth with a slight zing
- Sea salt: Wakes up all the tastes without making anything too salty
- Black pepper: Gives just enough warmth that works wonderfully with creamy eggs
- Mozzarella cheese: Melts into little pockets of stretchy delight throughout your eggs
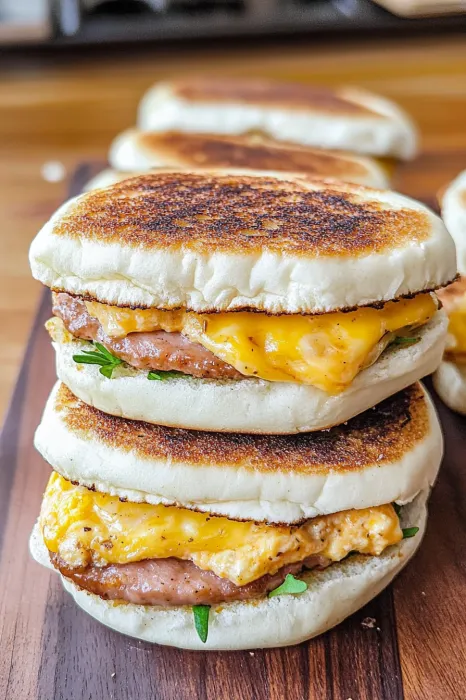
- English muffins: Just the right size with tiny holes that catch all the flavors. Look for ones with texture
- Unsalted butter: Turns your muffins golden and crunchy while adding rich taste
- Monterey Jack cheese: Smooth but flavorful and melts beautifully. Get slices thick enough for that satisfying cheese stretch
- Black Forest ham: Brings tasty protein that goes great with eggs. Get yours sliced at the deli counter for best results
Making Your Sandwiches
- Mix Up Your Eggs:
- Blend eggs, milk, sour cream, salt and pepper until smooth with no white streaks anywhere. Mix in mozzarella cheese gently but fully. Pour into a 9x13 dish you've buttered well, making sure it's spread flat. Cook at 350°F for about 18-20 minutes until the top doesn't look wet but still wobbles a bit in the middle. The eggs will finish cooking as they sit. Let them cool for 15 minutes before you cut them.
- Get Your Muffins Ready:
- Pull apart all your English muffins using a fork instead of cutting them to keep their texture. Butter both cut sides well. Put them cut-side up on a baking sheet with space between each one. Broil for 2-3 minutes, but watch them closely so they don't burn. You want them golden and a little crisp around the edges but still soft inside. Take them out and let them cool a bit.
- Put Everything Together:
- Set out all your muffin bottoms on your counter. Place a piece of egg in the middle of each one. Add one slice of Monterey Jack right on the warm egg so it starts to melt a little. Put two pieces of ham on top, folded to fit the muffin. Finish by putting the toasted muffin tops on.
- Get Them Ready for Freezing:
- Wrap each sandwich right away in plastic wrap, making sure to cover it completely so it doesn't get freezer burn. Push out any air bubbles as you wrap. Stack all your wrapped sandwiches in a big freezer bag and squeeze the air out before closing it. Write the date and what's inside on the bag before you stick it in the freezer for up to two months.
 Pin it
Adding sour cream was actually a lucky mistake when I ran out of milk one day and had to get creative. That little change totally upgraded the eggs, making them incredibly soft and rich. My family can tell right away if I try to skip it now.
Make Them Your Own
These breakfast sandwiches are meant to be changed up however your family likes them. Try using crispy bacon instead of ham, or breakfast sausage patties, or even sliced avocado if you don't eat meat. Switch the cheese to cheddar, spicy pepper jack, or mild Swiss depending on what you like. You can mix veggies into the eggs too – try cooked spinach, bell peppers, or sweet caramelized onions. Just remember to cook wet vegetables first and drain them well so your sandwiches don't turn soggy.
 Pin it
Great First Meal Prep Project
If you've never tried meal prepping before, start with these breakfast sandwiches. They're easy to make and don't need fancy equipment. The best part is how much time you'll save in the morning. Think about making twice as many your first time so you can try different warming methods and see what works best. Some family members might like theirs less hot in the middle while others want everything steaming hot. You can adjust your microwaving once you learn what everyone prefers.
Take Them Camping Or Traveling
We found out these make awesome camping food when we got tired of eating granola and oatmeal every morning. For camping, I let the sandwiches thaw overnight in our cooler, then warm them in heavy foil over the morning fire. The bit of smokiness from the campfire adds amazing flavor you can't get at home. They're great for road trips too when packed in a small cooler. Just ask to use the microwave at a gas station or rest stop if you want them hot. My kids now connect these sandwiches with our family adventures, so they're both practical and meaningful.
Frequently Asked Questions
- → Can I swap out the cheese type?
You sure can! Try cheddar, Swiss, provolone, or any other cheese you'd like for a different taste.
- → What's the best way to warm these up?
Warm them straight from frozen in the microwave, let them thaw before microwaving, or toast them over a fire or grill.
- → What else can I fill them with?
Get creative with bacon, sausage, turkey, or vegetarian choices like grilled veggies or avocado slices.
- → How long do these keep in the freezer?
If they're tightly wrapped and stored in a freezer bag, they'll be good for about two months.
- → Can I make a gluten-free version?
Absolutely, just replace the muffins with gluten-free bread or muffins of your choice.