
 Pin it
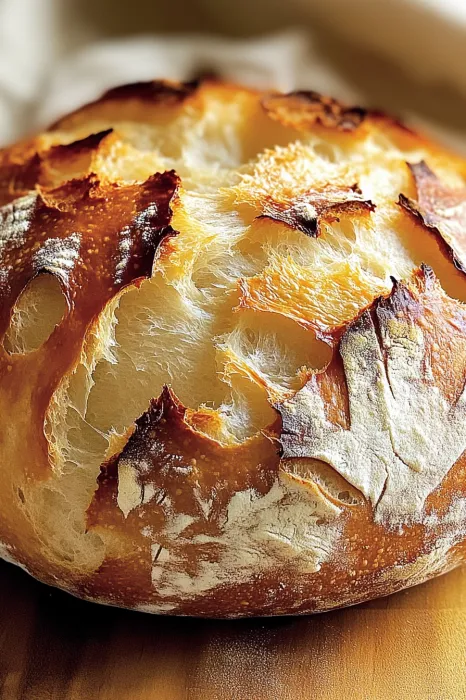
This quick and easy no-knead bread revolutionized my home baking routine, delivering bakery-quality results with minimal effort. The crispy, crackly crust paired with a soft, airy interior creates bread perfection that tastes like you spent hours in the kitchen when it actually requires just minutes of active work.
I discovered this technique during a snowstorm when I couldn't get to the store, and it's since become our weekend tradition. My family now expects the comforting aroma of fresh bread wafting through the house every Sunday morning.
Ingredients
- All-purpose flour: Forms the backbone of this recipe giving you a reliable structure without needing specialty bread flour
- Instant yeast: Ensures quick rising without the fuss of proofing first
- Salt: Enhances flavor and controls yeast activity for proper fermentation
- Warm water: Activates the yeast and brings the dough together look for water that feels like comfortable bath temperature
- Olive oil (optional): Adds richness and creates a slightly softer crust
Step-by-Step Instructions
- Mix the dough:
- Combine the dry ingredients first by whisking the flour yeast and salt thoroughly in a large bowl. This ensures even distribution of these critical elements. Pour in the warm water and stir with a wooden spoon until you see a shaggy sticky mixture form. The dough will look rough and uneven which is exactly what you want. Cover the bowl and let science do the work as the dough rises for 1 to 2 hours until it doubles in size developing those beautiful air pockets.
- Shape the dough:
- After the initial rise dust your work surface and hands with a light coating of flour to prevent sticking. Gently transfer the dough which will be quite loose onto your floured surface. Fold it over itself several times from the edges toward the center forming a rough ball shape. This creates tension on the surface without traditional kneading. Transfer to parchment paper for its final rest while your oven preheats allowing the gluten to relax.
- Preheat the oven and pot:
- Heat your oven to 450°F while simultaneously placing your Dutch oven inside. This critical 30minute preheat creates an intensely hot environment that mimics professional steam ovens. The enclosed heated pot traps moisture from the dough creating the perfect conditions for that crackling crust development.
- Bake the bread:
- With extreme care remove your scorching hot Dutch oven using good quality oven mitts. Lift the dough using the parchment paper as handles and lower it into the pot paper and all. Cover with the lid trapping steam inside which prevents the crust from hardening too quickly allowing maximum rise. After 30 minutes remove the lid exposing the bread to direct heat for the final browning phase continuing for 10 to 15 minutes until you achieve that beautiful golden color.
- Cool and serve:
- Exercise patience during cooling as this final step is crucial for texture development. The bread continues cooking internally as steam escapes and the crumb structure sets. Wait at least 15 minutes before slicing to prevent squishing the interior which would result in a gummy texture. Then enjoy the magnificent contrast between that shattering crust and tender inside.
 Pin it
This bread holds a special place in my heart because it was the first recipe that made me feel like a real baker. The moment when I pulled that first golden loaf from the oven my kitchen filled with an aroma that transported me back to my grandmother's kitchen where bread was never purchased but always made with love.
Storage Solutions
Homemade bread lacks commercial preservatives which is wonderful for flavor but affects storage life. For optimal freshness keep your bread at room temperature wrapped in a clean kitchen towel for the first day. This method preserves the crisp crust better than plastic which causes condensation and softening. For longer storage slice the entire loaf once completely cooled then freeze individual pieces separated by parchment paper in a freezer bag. This allows you to thaw only what you need and toast directly from frozen for nearly fresh-baked taste.
Flavor Variations
Transform this basic recipe into countless creative variations by adding mix-ins before the initial rise. For a Mediterranean twist incorporate a quarter cup of chopped olives a tablespoon of fresh rosemary and a teaspoon of lemon zest. Sweet versions work beautifully too try adding cinnamon and raisins or dried cranberries and orange zest for breakfast bread. For a more rustic loaf replace up to one cup of all-purpose flour with whole wheat rye or spelt flour remembering that whole grain substitutions may require slightly more water and produce a denser result.
Troubleshooting Tips
Bread baking sometimes presents challenges even with simple recipes. If your bread spreads rather than rises upward your dough likely contained too much moisture. Next time reduce water by two tablespoons or add three additional tablespoons of flour. For a lackluster crust check your oven temperature with an oven thermometer most home ovens run cooler than their settings. If your bread has large irregular holes the fermentation proceeded too quickly reduce rising time or use cooler water. Remember that humidity and kitchen temperature dramatically affect bread dough so adjust accordingly with different seasons.
 Pin it
Frequently Asked Questions
- → Can I use whole wheat flour instead of all-purpose flour?
You can replace up to 1 cup of all-purpose flour with whole wheat flour for a denser bread with a nuttier flavor.
- → Do I need a Dutch oven to bake this bread?
A Dutch oven is ideal for a crispy crust, but you can use any heavy oven-safe pot with a lid or a baking dish covered with foil.
- → How do I store this bread?
Store the bread in a paper bag or wrapped in a clean kitchen towel at room temperature for up to 2 days. For longer storage, freeze sliced bread in a freezer-safe bag for up to 3 months.
- → Can I add extra flavors to the bread?
Yes, you can add garlic powder, dried herbs like rosemary, thyme, or sprinkle seeds on top before baking for more flavor.
- → How do I ensure the bread has a soft crust?
Adding 1 tablespoon of olive oil to the dough will result in a softer crust. Alternatively, store the bread in a plastic bag after cooling.
- → How do I know when the bread is done?
The bread is done when it has a golden-brown crust and sounds hollow when tapped on the bottom. You can also use a thermometer—the internal temperature should be around 200°F (93°C).