
 Pin it
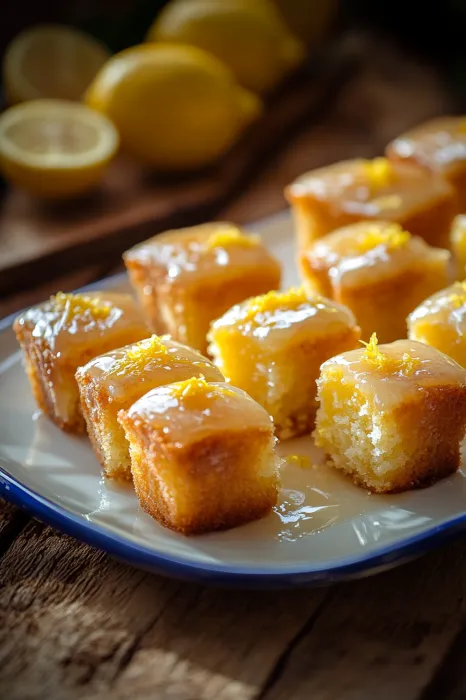
This sunny, zesty mini lemon loaf has become my favorite quick fix when I need something sweet that wows without spending forever in the kitchen. The combo of juicy cake and sharp lemon topping brings a burst of brightness to any get-together, from Sunday morning gatherings to casual coffee breaks.
I first baked these tiny lemon treats for a backyard gathering last spring. The zippy citrus taste was such a success they vanished in seconds, and I've been tweaking the recipe since then. My top trick is always using fresh-squeezed juice and newly grated zest since it really pumps up the flavor punch.
Ingredients
- All purpose flour: builds the soft, delicate texture foundation
- Lemon zest: delivers powerful citrus notes throughout the mix
- Baking powder: creates the perfect amount of rise for fluffy results
- Salt: cuts through sweetness and boosts the lemon taste
- Granulated sugar: gives sweetness and helps lock in moisture
- Butter: adds a rich, creamy taste that can't be matched
- Eggs: hold everything together and make the texture wonderfully soft
- Vanilla extract: brings extra flavor layers to complement the lemon
- Lemon juice: adds sharp tanginess to both the cake and topping
- Buttermilk: makes an incredibly juicy cake with slight tang
- Powdered sugar: creates that irresistible sweet finishing touch
Step-by-Step Instructions
- Prepare The Oven And Pan:
- Heat your oven to 350°F and spray your mini loaf pan thoroughly with non-stick spray. Don't forget the edges and corners so your loaves pop out easily later. This step makes all the difference for how they look.
- Mix The Dry Ingredients:
- In a medium bowl, stir together the flour, baking powder, salt, and lemon zest until they're well mixed. Make sure the zest gets evenly spread throughout so every bite has that lemony goodness.
- Cream Butter And Sugar:
- In a large bowl, mix the butter and granulated sugar until it turns fluffy and light, about 3 minutes. This step puts air in your batter, making your finished loaves lighter. The mix should get pale and slightly bigger.
- Add The Eggs:
- Drop in eggs one at a time, mixing well after each one until they're completely blended. Adding them slowly keeps the batter smooth and stops it from splitting. It might look a bit curdled at first but will come together.
- Combine Wet And Dry Ingredients:
- Switch back and forth with the flour mix and buttermilk, starting with half the flour and mix just enough to blend, then half the buttermilk and mix again. Repeat with what's left. This way helps avoid too much mixing which would make tough loaves.
- Bake To Perfection:
- Fill each section of your prepared pan about two-thirds full to give room for rising. Bake for 20 to 25 minutes until a toothpick stuck in the middle comes out mostly clean with just a few damp crumbs. Don't cook too long or they'll dry out.
- Cool The Loaves:
- Let the loaves sit in the pan for 5 minutes before moving to a cooling rack. This short rest helps them firm up enough to move without breaking, while the rack lets air flow around them so they don't get soggy.
- Make The Lemon Icing:
- In a small bowl, mix powdered sugar, lemon juice, and lemon zest, stirring until it's totally smooth. It should be thick enough to coat the back of a spoon but still able to pour. If it's too thick, add a few more drops of lemon juice.
- Glaze The Loaves:
- While the loaves are still a bit warm, spoon the lemon icing generously over each one. The warmth helps the icing spread nicely and soak partly into the tops, adding extra moisture and flavor all through.
 Pin it
The lemon zest really makes this recipe special. I always grate my lemons before squeezing the juice, and I only use the bright yellow outer part, staying away from the white bitter layer underneath. My grandma showed me this method long ago, telling me that the oils in the zest hold the strongest lemon flavor, and now I can't make any citrus dessert without doing this.
 Pin it
Storage Tips
These tiny lemon treats stay good at room temperature in a sealed container for up to 3 days. The moisture from the buttermilk helps them stay soft longer than many other quick breads. If you want them to last longer, putting them in the fridge keeps them fresh for up to a week, though they taste best when you let them warm up before eating.
To keep them even longer, wrap each cooled, unglazed loaf on its own in plastic wrap, then put them in a freezer bag for up to 3 months. Let them thaw in the fridge overnight and add fresh glaze before serving for the best taste and feel. The glaze doesn't freeze well, so always add it after thawing.
Flavor Variations
While regular lemon tastes great, these mini loaves can be changed up in fun ways. Try adding 1/2 cup of fresh blueberries to the mix for pretty color contrast and matching flavor. Mixing in 1/4 cup of poppy seeds gives you a classic lemon poppy seed loaf with nice crunch. For a richer citrus blend, swap half the lemon zest with orange or lime zest.
Around the holidays, adding 1/2 teaspoon of dried lavender to the sugar before mixing with butter adds a light floral hint that works really well with lemon. For a fancier version, try drizzling melted white chocolate over the glazed loaves for a pretty finish and tasty flavor combo.
Serving Suggestions
These mini lemon loaves work great as part of a lazy weekend breakfast spread with fresh berries and whipped cream. For afternoon snacks, cut each loaf across the middle and spread with a thin layer of lemon curd or cream cheese for a fancy treat that goes perfectly with a cup of Earl Grey.
For an after-dinner sweet, warm up a slice slightly and top with a small scoop of vanilla ice cream and fresh berries. The difference between the warm loaf and cold ice cream makes an unforgettable dessert experience. These handy little cakes also work great tucked into lunch boxes or picnic baskets for a sweet surprise.
Frequently Asked Questions
- → How do I keep them soft?
Don’t overmix your batter and take them out of the oven as soon as a toothpick comes out almost clean. Buttermilk also boosts their softness and moisture.
- → What can I use instead of buttermilk?
You can make your own by stirring half a cup of milk with half a tablespoon of lemon juice or vinegar. Let it sit for a few minutes to thicken before using.
- → Can these be baked in advance?
Absolutely! Bake them the day before and store them sealed in a container. Just add the icing when you’re ready to serve for the freshest result.
- → Which lemons should I pick?
Go for fresh lemons! They’ll give you the boldest flavor with their natural zest and juice.
- → How do I store leftovers?
Keep them in a sealed container at room temperature for 2 days or in the fridge for a week. For the best taste, glaze them just before serving if refrigerated.