
 Pin it
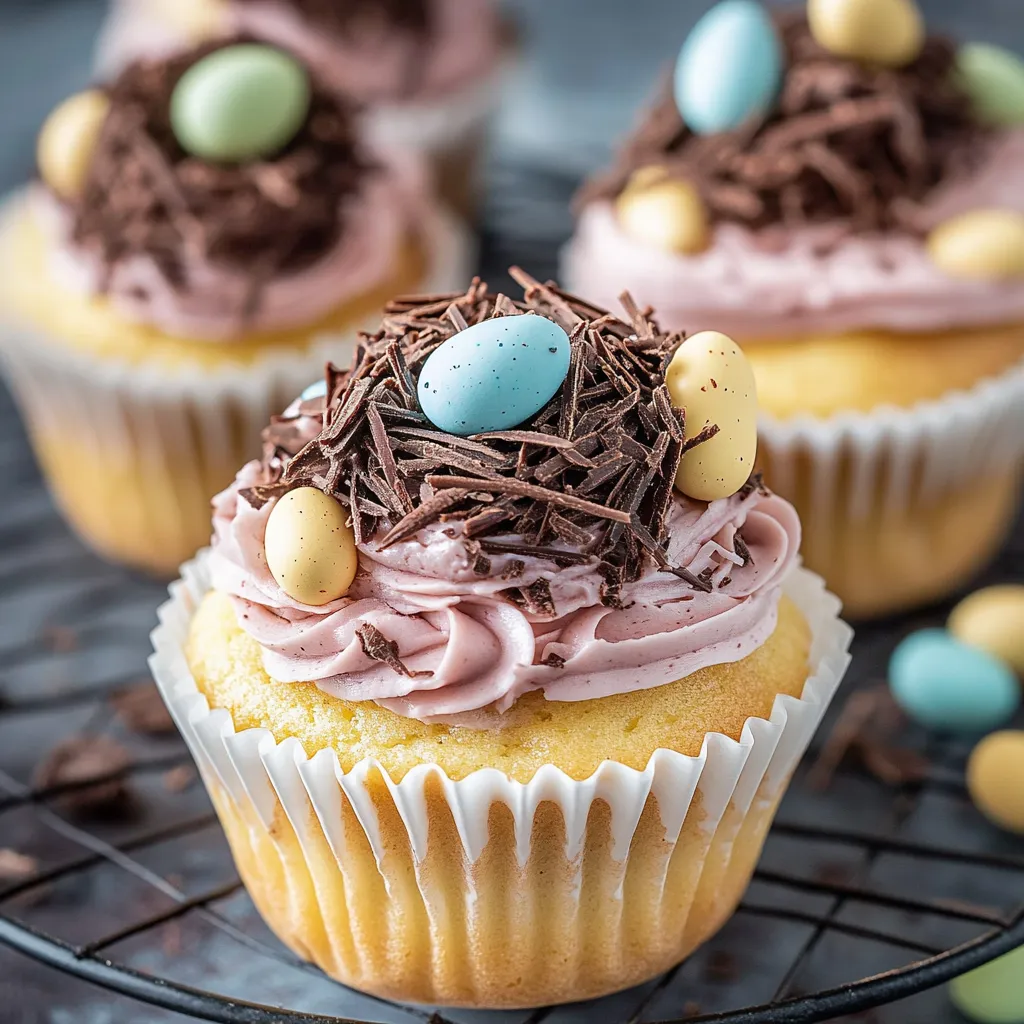
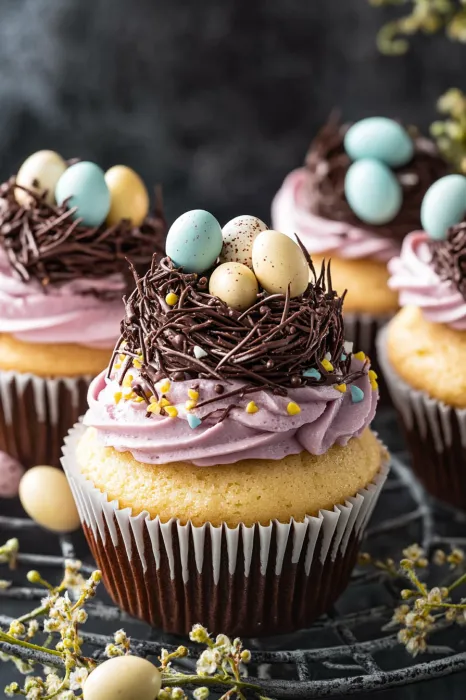
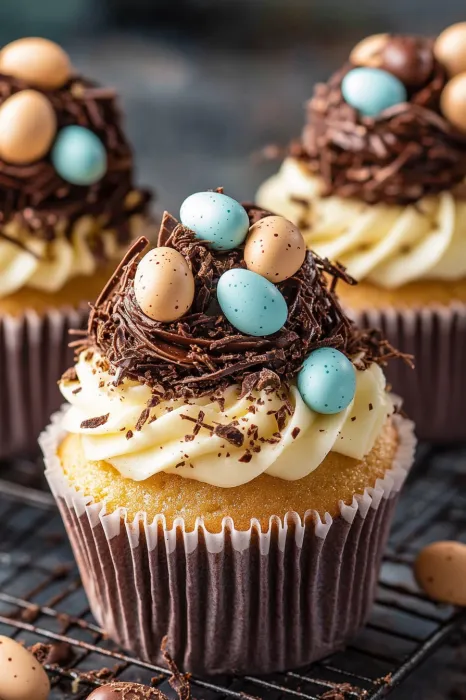
These Easter cupcakes have become my spring baking tradition, bringing festive cheer to holiday gatherings with their delicate vanilla flavor and adorable chocolate nests topped with colorful mini eggs.
I first made these cupcakes when hosting my first Easter brunch as a newlywed. The delighted faces around the table convinced me they needed to become our annual tradition. Now my nieces help decorate them every year, making it our special holiday bonding time.
Ingredients
- All purpose flour: creates the perfect tender crumb in these cupcakes. Make sure to measure by spooning into measuring cups and leveling off.
- Baking powder: provides the lift for fluffy texture. Check that yours is fresh for best results.
- Unsalted butter: adds richness and creates the foundation for both cake and frosting. Quality matters here.
- Granulated sugar: sweetens the cake perfectly without being overwhelming.
- Large eggs: provide structure and moisture. Room temperature eggs incorporate much better.
- Vanilla extract: infuses the batter with warm flavor. Use pure extract for the best taste.
- Whole milk: creates tenderness. The fat content helps create moist cupcakes.
- Powdered sugar: creates silky smooth buttercream. Sift first to avoid lumps.
- Food coloring: customizes the spring look. Gel colors provide vibrant hues with minimal liquid.
- Mini chocolate eggs: add the perfect festive touch. Cadbury eggs have the ideal size and pastel colors.
- Cocoa powder: mixed with vanilla creates realistic speckles. Dutch process gives the deepest color.
- Chocolate: for the nests adds texture and flavor contrast. Use semisweet or dark for best results.
- Thyme sprigs: add an unexpected natural element. They look like tiny branches in the nests.
Step-by-Step Instructions
- Prepare Your Workspace:
- Preheat your oven to 350°F and line your cupcake pan with paper liners. I recommend arranging all ingredients measured and ready before starting to ensure smooth preparation. Having everything at room temperature will make mixing much easier.
- Mix The Dry Ingredients:
- Whisk together flour, baking powder, and salt in a medium bowl until thoroughly combined. This step ensures even distribution of leavening agents for perfectly risen cupcakes. Use a whisk rather than a spoon for best results.
- Cream Butter And Sugar:
- Beat softened butter and granulated sugar together for at least 3 minutes until the mixture turns noticeably lighter in both color and texture. This crucial step incorporates air into the batter, creating tender cupcakes. The mixture should look almost fluffy.
- Add Wet Ingredients:
- Incorporate eggs one at a time, allowing each to fully blend before adding the next. Then mix in vanilla extract. Scrape down the sides of the bowl between additions to ensure everything combines evenly. The batter might look slightly curdled at this stage, which is normal.
- Combine Wet And Dry Ingredients:
- Gradually add the flour mixture alternating with milk, beginning and ending with flour. Fold gently with a spatula just until combined. Overmixing at this stage activates gluten, resulting in tough cupcakes. Stop mixing as soon as the last streaks of flour disappear.
- Bake To Perfection:
- Fill cupcake liners about two thirds full for ideal doming. Bake for 18 to 20 minutes, checking at the early end of the time range. The tops should spring back when lightly touched, and a toothpick inserted in the center should come out clean or with a few moist crumbs.
- Create Creamy Buttercream:
- Beat softened butter until remarkably light and fluffy, about 3 minutes. Gradually add powdered sugar in small amounts, mixing thoroughly between additions. Add vanilla and beat for another 3 minutes until extremely light and fluffy. The extended beating time creates the silkiest texture.
- Color And Pipe:
- Add food coloring gradually until reaching your desired shade. Remember that colors darken slightly as they set. Transfer to a piping bag fitted with a star tip and pipe generous swirls on completely cooled cupcakes. Start from the outside edge and work inward with steady pressure.
- Construct Chocolate Nests:
- Sprinkle chopped chocolate in the center of each frosted cupcake, forming a small nest shape. The warmth from your hands while handling the chocolate will help it adhere slightly to the frosting. Press gently to secure without flattening your beautiful piping work.
- Add Finishing Touches:
- Place three mini eggs in each chocolate nest, pressing lightly to secure. Mix cocoa powder and vanilla extract to create a speckled effect, then use a brush to flick the mixture onto the frosting for a natural, speckled egg appearance. Add tiny thyme sprigs as nest branches.
 Pin it
The mini eggs are truly what make these cupcakes magical. I remember the first time my three year old niece helped decorate these cupcakes, her tiny fingers carefully placing each egg in the nests while telling stories about the imaginary birds who would live in them. These small moments of joy are precisely why I love creating special holiday traditions through baking.
Storage And Make-Ahead Tips
These cupcakes can be stored at room temperature in an airtight container for up to three days. The buttercream forms a light crust that helps preserve them. If your kitchen runs warm, refrigeration is better, but always bring them to room temperature before serving for the best flavor and texture. Unfrosted cupcakes can be frozen for up to three months in freezer bags. Thaw overnight in the refrigerator, then frost and decorate just before serving.
Creative Variations
Transform these Easter cupcakes throughout the year with simple adjustments. For spring birthdays, swap the mini eggs for colorful sprinkles or fresh berries. During Christmas, use the same technique with red and green colors and top with holly-shaped sprinkles. The chocolate nests can become monster fur for Halloween with the addition of candy eyes. Add a tablespoon of lemon zest to the batter for a bright citrus version perfect for summer gatherings.
 Pin it
Perfect Pairings
Serve these cupcakes alongside fresh berries and mint-infused water for a refreshing spring dessert table. They pair wonderfully with afternoon tea, especially Earl Grey or a floral blend like chamomile. For brunch, offer them with a sparkling wine cocktail or a fruit punch for the children. The vanilla flavor complements almost any beverage, making them extremely versatile for any gathering.
Troubleshooting Tips
If your cupcakes sink in the middle, your oven temperature might be too high or you opened the oven door during baking. Always use an oven thermometer to verify temperature accuracy. Lumpy frosting usually means the butter wasn't soft enough before beating. For the speckled effect, if your cocoa mixture is too thick, add a few more drops of vanilla extract. If the chocolate nests aren't holding their shape, refrigerate the frosted cupcakes for 10 minutes before adding the chocolate.
Frequently Asked Questions
- → How do I make the vanilla cupcakes fluffy?
Start with room-temperature ingredients and carefully follow the steps to avoid overmixing the batter. Combine the ingredients gently to maintain air and achieve fluffy cupcakes.
- → Can I use store-bought frosting instead?
Yes, you can use pre-made frosting for convenience. However, homemade buttercream offers a better texture and flavor, elevating the cupcakes.
- → How do I achieve the speckled design on the frosting?
Mix cocoa powder and vanilla extract into a liquid paste. Use a pastry or paint brush to flick the mixture onto the frosting for a speckled effect.
- → Can I prepare the cupcakes in advance?
Yes, you can bake the cupcakes a day ahead and store them in an airtight container. Add the frosting and decorations just before serving.
- → What alternatives can I use for mini eggs?
You can use chocolate chips, small truffles, or candy-coated chocolates if mini eggs are not available.